domingo, 26 de abril de 2020

Removing Windows 8/8.1 Password With CHNTPW


[Update] If you want to recover Windows 8/8.1 passwords instead of removing them see this tutorial

So we are back. About a Year ago I wrote a post on how to remove Windows Password using CHNTPW but many readers complained that it was not working on Windows 8. I tried myself on many it worked but once I also got stuck. So I did a little work around. In this tutorial I'm going to show you how to remove Windows 8/8.1 passwords using CHNTPW. Well it's little bit tedious than the older one but believe me it's fun too.


Background:

Let's get started with a little bit background. Windows OSs have a User known as Administrator which is hidden by default. This user is there for security reasons (maybe it's the way around). Most of the users who use Windows are lame, sorry to say that but I'm not talking about you, they don't even know that such an invisible account exists so it is almost everytime without a password. But this Administrator user is a SU (Super User), that means you work wonders once you get access to this account. So our first task will be to make it visible and then we'll access it and using it's power privilages we'll remove password of other accounts (which is not really neccessary cuz you can access any user folder or file using Administrator Account).


Requirements:

1. Physical Access to the Victems computer.
2. A Live Bootable Kali/Backtrack Linux Pendrive or DVD.
    (You can downoad Kali Linux here)


Steps:

1. Plug in the Live Bootable Pendrive/DVD into to victim's computer and then boot from it.

2. After accessing kali linux (I'm using Kali Linux) from victim's computer open a terminal.

3. Now we have to mount the drive on which the victim's OS is loaded. In my case it is sda2. So in order to mount that drive I'll type the command:
mount /dev/sda2 /media/temp


this means that I'm mounting the drive in folder /media/temp if you haven't created a temp folder in /media then you must create one by typing these command:
cd /
mkdir /media/temp

4. After mounting the OS we need to access the SAM file and make visible Administrator account using chntpw. It's so simple lemme show you how.
first we'll navigate to /media/temp/Windows/System32/config:
cd /media/temp/Windows/System32/config

now we display the list of users on our victim's computer:
chntpw SAM -l


You'll see an Administrator User there which is disabled. Now we'll enable that:
chntpw SAM -u Administrator


now type 4 and hit return


press 'y' to save changes to SAM file.


OK voila! the hard part is done.

5. Now restart your Computer and take out your Pendrive/DVD from your computer and boot into windows 8 OS. You should be able to see Administrator User on Logon screen now. If not then look for a backward pointing Arrow besides the user Login Picture. Click on that Arrow and you should see an Administrator User. Click on the Administrator Account and wait for a while until windows 8 sets it up.

6. After a while you get Access to the computer and you can access anything. Enjoy :)

7. What you want to remove the password? I don't think it's a stealth mode idea, is it? OK I'll tell you how to do that but It's not a good hacker way of doing.
Open up the command prompt, simple way to do it is:

Press Ctrl + 'x' and then Press 'a' and if prompted click yes.
After that Enter following commands:

net user
(This command will display all users on computer)

net user "User Name" newPassword 
(This Command will change the Password of User Name user to newPassword).
OK you're done now logout and enter the new password. It will work for sure.

8. If you want to disable the Administrator Account again then type in command prompt:
net user Administrator /active:no

I tried it on Windows 8/8.1 all versions and it works. Guess what it works on all windows OSs.

Hope you enjoyed this tutorial. Don't forget to share it and yes always read the Disclaimer.

Related posts


  1. Experto En Seguridad Informática
  2. Cracker Definicion
  3. Hacker Profesional
  4. What Is Growth Hacking

5 Free Online Courses To Learn Artificial Intelligence

We are living in the era of fourth industrial revolution(4IR), where Artificial intelligence has a significant role to play. This 4IR technology embedded within societies and even into the human body. From Computer enthusiasts to common people, everyone should be aware and learn this breakthrough technology.
We think about gigantic Robots from Transformers when we hear about Artificial Intelligence(AI) which is a fiction in the past but a fact today, capable of transforming the whole tech world. The field of AI consists of more than Robots such as personal assistants, self-driving cars, apprenticeship learning, behavior cloning and so on. To learn about this advanced technology, thanks to the online learning resources which offers great content to get started with artificial intelligence.

Here are the 5 free e-learning courses on Artificial Intelligence

1. UC Berkeley CS188 Intro to AI

Get started with UC Berkeley AI course, this course is absolutely for beginners who are unaware of Artificial intelligence. It doesn't need any prior computer knowledge to know about AI. UC Berkeley allows anyone to learn this course for free. This course is systematically presented and consists of the following:
  • Course Schedule
  • Complete sets of Lecture Slides and Videos
  • Interface for Electronic Homework Assignments
  • Section Handouts
  • Specs for the Pacman Projects
  • Source files and PDFs of past Berkeley CS188 exams
  • Form to apply for edX hosted autograders for homework and projects (and more)
  • Contact information
Aside from this, you can also browse the following courses as well from UC Berkeley that are part of AI course:
  • Machine Learning: CS189, Stat154
  • Intro to Data Science: CS194-16
  • Probability: EE126, Stat134
  • Optimization: EE127
  • Cognitive Modeling: CogSci131
  • Machine Learning Theory: CS281A, CS281B
  • Vision: CS280
  • Robotics: CS287
  • Natural Language Processing: CS288

2. Artificial Intelligence: Principles and Techniques

This course is offered by Stanford with great content that includes topics, videos, assignments, projects, and exams. The whole course mainly focuses on the complex real-world problems and try to find similarity between web search, speech recognition, face recognition, machine translation, autonomous driving, and automatic scheduling. Here you will learn the foundational principles of AI and implement some the AI systems. The goal of this course is to help you tackle the real-world situations with the help of AI tools. So, it is the best for the beginner to get started with AI.

3. Learn with GOOGLE AI

Who will dislike the course from Google? absolutely no one. This company is one of the early adopters of AI has a lot to offer to learners. Learn with Google AI is an education platform for people at all experience levels, it is free to access and browse content. The education resources provided by Google is from the machine learning experts of the company. These resources are the collections of lessons, tutorials, and Hands-on exercises that help you start learning, building, and problem-solving.

4. MIT 6.S094: Deep Learning for Self-Driving Cars

This course gives the practical overview of Deep Learning and AI. It is the course for beginners, also for the people who are getting started with Machine Learning. The course also offers a lot of benefits to the experienced and advanced researchers in the field deep learning. This MIT's course takes people into the journey of Deep Learning with the applied theme of building Self-Driving cars. However, the course also offers slides and videos to engage the learners.

5. Fundamentals of Deep Learning for Computer Vision

This course is offered by Nvidia and Nvidia Deep learning Institute. Computer Vision is one of the disciplines of AI that acquire, analyze, process, and understand images. The course is completely free and everyone who is enthusiast about AI can access and learn the course. It is a hands-on course that able to provide basics of deep learning and deployment of neural networks. With this. you will also learn the following:
  • Identify the ingredients required to start a Deep Learning project.
  • Train a deep neural network to correctly classify images it has never seen before.
  • Deploy deep neural networks into applications.
  • Identify techniques for improving the performance of deep learning applications.
  • Assess the types of problems that are candidates for deep learning.
  • Modify neural networks to change their behavior.
Related news

Hacking All The Cars - Part 2


Connecting Hardware to Your Real Car: 

 I realized the other day I posted Part 2 of this series to my youtube awhile ago but not blogger so this one will be quick and mostly via video walkthrough. I often post random followup videos which may never arrive on this blog. So if you're waiting on something specific I mentioned or the next part to a series its always a good idea to subscribe to the YouTube. This is almost always true if there is video associated with the post.  

In the last blog we went over using virtual CAN devices to interact with a virtual car simulators of a CAN network This was awesome because it allowed us to learn how to interact with he underlying CAN network without fear of hacking around on an expensive automobile. But now it's time to put on your big boy pants and create a real CAN interface with hardware and plug your hardware device into your ODB2 port. 

The video I created below will show you where to plug your device in, how to configure it and how to take the information you learned while hacking around on the virtual car from part1 and apply it directly to a real car.   

Video Walk Through Using Hardware on a Real Car


As a reference here are the two device options I used in the video and the needed cable: 

Hardware Used: 

Get OBD2 Cable:
https://amzn.to/2QSmtyL

Get CANtact:
https://amzn.to/2xCqhMt

Get USB2CAN:
https://shop.8devices.com/usb2can


Creating Network Interfaces: 

As a reference here are the commands from the video for creating a CAN network interface: 

USB2Can Setup: 
The following command will bring up your can interface and you should see the device light color change: 
sudo ip link set can0 up type can bitrate 125000

Contact Setup: 
Set your jumpers on 3,5 and 7 as seen in the picture in the video
Sudo slcand -o -s6 /dev/ttyACM can0 <— whatever device you see in your DMESG output
Ifconfig can0 up

Summary: 

That should get you started connecting to physical cars and hacking around. I was also doing a bit of python coding over these interfaces to perform actions and sniff traffic. I might post that if anyone is interested. Mostly I have been hacking around on blockchain stuff and creating full course content recently so keep a look out for that in the future. 

Related articles

  1. Wordpress Hacking
  2. Hacking Course
  3. Hacking Day
  4. Hacking Hardware Tools
  5. Crack Definicion

sábado, 25 de abril de 2020

Hacking PayPal's Express Checkout


Do you know what is happening in the background when you buy something in an online shop using PayPal?

In this post we will tackle the following problems:
  • How can PayPal's API be tested?
  • How does PayPal's Express Checkout work? You can find the detailed report here.
  • How can we debit more money than authorized?

How PayPal's API can be tested?

PayPal's Sandbox API

PayPal offers a feature called PayPal Sandbox Accounts, which mimics the production API. The basic idea is that a normal user/shop can test the API and make transactions without actually transferring money. This is the perfect tool for developers to test their API integration.

Access to all messages

The next question is how to get access to all messages. All browser-related messages can be inspected, intercepted, and modified via BurpSuite. The main problem here is how to get access to the server-to-server exchanged messages: the messages exchanged between PayPal and a shop. In order to solve this problem, we deployed our own shop. For this purpose we used Magento, which already has a PayPal integration.
Once we have our own controlled shop, we can enforce Magento to send all request through a proxy.
In the following picture you can see our setup.

Test suite for analyzing PayPal's API [1]

In order to capture the traffic between our Magento hhop and PayPal we proceeded as follows:
  • We configured Magento to use a proxy running on localhost:8081.
  • We connected the proxy port on the virtual machine with our local machine via SSH remote port forwarding by issuing the following command
    ssh -N -R 8081: localhost :8081 <IP of Magento shop>
  • We configured BurpSuite running on our local machine to listen on Port 8081 for incoming requests.
Now, we were able to see the entire traffic.
Please note that we uses our own, custom Magento shop in order to be able to test Paypal's API.

PayPal's Express Checkout

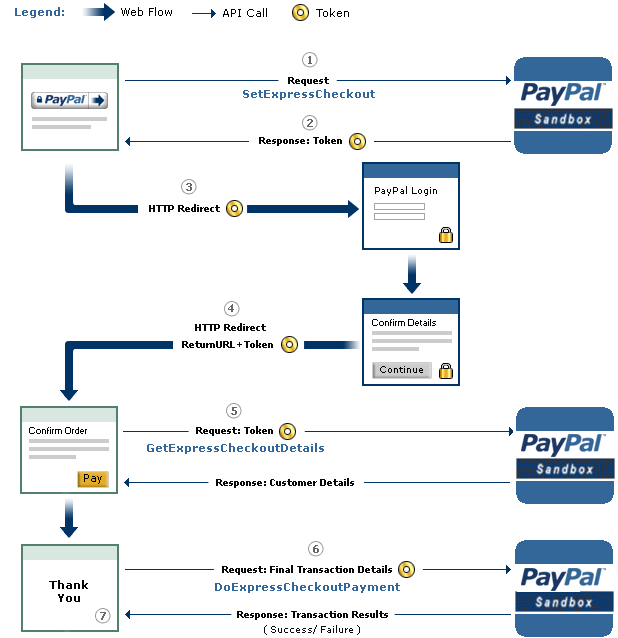
An overview of the checkout procedure is depicted in the following:

PayPal's Express Checkout [2]


Step 1: Magento tells the PayPal API where to redirect the user after authorizing the transaction via the parameter RETURNURL and requests a token for this transaction.
Step 2: The PayPal API provides Magento with the token.
Step 3: Magento redirects the user to PayPal's website. The redirect contains the token from the previous step.
Step 4:  The user authorizes the transaction. As a result, he will be redirected back to Magento (RETURNURL) with the token.
Step 5: Magento issues a request to the PayPal API to get the transaction details.

Step 6: Magento signals the PayPal API to execute the transaction.

Step 7: Magento serves the success page.

A more detailed view of the protocol and all parameters is shown on page 16 in the full version. We will concentrate only on step 6 and the parameters relevant for the attack.

The Attack

The goal of the attack is to let a shop (in our case Magento) debit more money than authorized by the PayPal user. The core of the attack is Step 6 -- DoExpressCheckoutPayment. Let's get a deeper look at this message:

Magento can raise the authorized amount and debit more money from the user's account

  • The shop sends the token, which was issued in the first step of the protocol and identifies uniquely the transaction through all steps. 
  • The PayerID referring to the user that authorized the payment.
  • The AMT defining the amount, which will be transferred.
  • The API Credentials authenticating Magento on PayPal.
  • The Version pointing to the release number of the API.

As one can imagine, the core problem we found was the change of the AMT parameter. This value can be freely chosen by the shop, despite the fact that the user has authorized a different amount.

We tested only the SandBox API, but refused to test the production API in order to avoid problems. We promptly contacted PayPal's security team and described the problem hoping that PayPal can and will test the production API against the attack.

The response of PayPal can be summarized as follows:
  • We don't get any BugBounty since we only tested the Sanbox API. (Fair enough)
  • In the Production API PayPal this flexibility is a wanted feature. Thus, PayPal allows a merchant to charge for shipping and/or other expenses different amounts. Any malicious behavior can be detected by PayPal. In case of fraudulent charges the consumer are protected by the Buyer Protection policy.
... but the Sandbox API was nevertheless fixed.

Authors of this Post

Daniel Hirschberger
Vladislav Mladenov
Christian Mainka (@CheariX)


[1] BurpSuite Logo
[2] PayPal Express Checkout

More information


  1. Hacking Ethical
  2. Penetration Testing A Hands-On Introduction To Hacking
  3. Que Significa Hat
  4. Car Hacking
  5. El Hacker
  6. Hacking Books
  7. Drupal Hacking
  8. Hacking Hardware Tools
  9. Programa De Hacking
  10. Hacking Traduccion
  11. Hacking Mac

Top 5 Most Useful Linux Tools For Programmers

Top 5 most useful linux tools for Programmer

Linux is a free and open-source software operating systems built around the Linux kernel. It typically packaged in a form known as a Linux distribution for both desktop and server use. It is a great development environment for programmers and developers. However, without the development tools, that would be impossible. Fortunately, plenty of Linux tools are available. Here are the top 5 most useful Linux tools for programmers.

Also Read;-  How To Clone One Android To Another

5 Most Useful Linux tools for Programmers

1. VIM

vim editor-compressed
VIM is a free and open source software written by Bram Moolenaar in 1991. It is designed for use both from a command-line interface and as a standalone application in a graphical user interface. It comes standard with almost every Linux distribution and is also known as "the programmer's editor". VIM is great for coding and can also be used for editing things like configuration files and XML documents.
Vim has been developed to be a cross-platform that supports many other platforms. In 2006, it was voted as the most popular editor amongst Linux Journal readers. In 2015, Stack Overflow developer survey found it to be the third most popular text editor while in 2016, the Stack Overflow developer survey found it to be the fourth most popular development environment.
Read more;-  How To Use WhatsApp without Mobile No

2. Zsh

Zsh is written in C and initially released in 1990. It is a Unix shell that can be used as an interactive login shell and as a powerful command interpreter for shell scripting. Zsh is an extended version of Bourne shell (BASH) with a large number of improvements, including some features of Bash, ksh, and tcsh. Zsh gives a user-friendly experience on the command line. It also gives better auto-completion, Vim key bindings, and smart guesses when you write a command wrong.
Its features include (but not limited to):
  • Programmable command-line completion,
  • Sharing of command history among all running shells
  • Extended file globbing
  • Improved variable/array handling
  • Editing of multi-line commands in a single buffer
  • Spelling correction
  • Various compatibility modes,
  • Themeable prompts, and
  • Loadable modules.

3. Byobu

It was initially released in 2009 written in Sh and Python. Byobu can be used to provide on-screen notification or status and tabbed multi-window management. Thus, it is intended to improve terminal sessions when users connect to remote servers with an operating system Linux and Unix-like. It is is an enhancement for the GNU Screen terminal multiplexer or tmux used with the GNU/Linux computer operating system.

4. GIT

git commandsGit was initially released on April 7, 2005. It is a version control system to track changes in computer files and to coordinate work on those files among multiple people. It is primarily used for source code management in software development and can be used to keep track of changes in any set of files available in the English language. It is aimed at speed, data integrity, and support for distributed, non-linear workflows. It is free and open source software distributed under the terms of the GNU General Public License version 2.
Moreover, Linus Torvalds was the creator of GIT for the development of the Linux kernel. On the other hand, its current maintainer since then is Junio Hamano. Thus, every Git directory on every computer is a full-fledged repository with complete history and full version tracking abilities, independent of network access or a central server.

5. Docker

Written by Solomon Hykes in 2013, it is a computer program that performs operating-system-level virtualization, the containerization, which is developed by Docker, Inc. Primarily, Docker was developed for Linux to use as the resource isolation features of the Linux kernel. It is a tool that can package an application and its dependencies in a virtual container that can run on any Linux server. This helps enable the flexibility and portability on where the application can run, whether on premises, public cloud, private cloud, bare metal, etc.  Moreover, it accesses the Linux kernel's virtualization features either directly using the libcontainer library.

Related links


  1. Curso De Hacking Etico
  2. Como Convertirse En Hacker
  3. Que Estudiar Para Ser Hacker
  4. Hacking Con Buscadores
  5. El Mejor Hacker
  6. Hacking Live
  7. Growth Hacking Barcelona
  8. Paginas De Hackers
  9. Como Ser Hacker
  10. Hacking Food
  11. Servicio Hacker

What Is Keylogger? Uses Of Keylogger In Hacking ?


What is keylogger? 

How does hacker use keylogger to hack social media account and steal important data for money extortion and many uses of keylogger ?

Types of keylogger? 

===================

Keylogger is a tool that hacker use to monitor and record the keystroke you made on your keyboard. Keylogger is the action of recording the keys struck on a keyboard and it has capability to record every keystroke made on that system as well as monitor screen recording also. This is the oldest forms of malware.


Sometimes it is called a keystroke logger or system monitor is a type of surveillance technology used to monitor and record each keystroke type a specific computer's keyboard. It is also available for use on smartphones such as Apple,I-phone and Android devices.


A keylogger can record instant messages,email and capture any information you type at any time using your keyboard,including usernames password of your social media ac and personal identifying pin etc thats the reason some hacker use it to hack social media account for money extortion.

======================

Use of keylogger are as follows- 

1-Employers to observe employee's computer activity. 

2-Attacker / Hacker used for hacking some crucial data of any organisation for money extortion.

3-Parental Control is use to supervise their children's internet usage and check to control the browsing history of their child.

4-Criminals use keylogger to steal personal or financial information such as banking details credit card details etc and then which they will sell and earn a good profit. 

5-Spouse/Gf tracking-if you are facing this issue that your Spouse or Gf is cheating on you then you can install a keylogger on her cell phone to monitor her activities over the internet whatever you want such as check Whats app, facebook and cell phone texts messages etc . 

=====================

Basically there are two types of keylogger either the software or hardware but the most common types of keylogger across both these are as follows-

API based keylogger 

Form Grabbing Based Keylogger 

Kernal Based Keylogger 

Acoustic Keylogger ETC . 

====================

How to detect keylogger on a system?

An antikeylogger is a piece of software specially designed to detect it on a computer. 

Sometype of keylogger are easily detected and removed by the best antivirus software. 

You can view  the task manager(list of current programs) on a windows PC by Ctrl+Alt+Del to detect it.

Use of any software to perform any illegal activity is a crime, Do at your own risk.


Related articles


  1. Hacking Academy
  2. Un Hacker
  3. Rfid Hacking
  4. Hacking Etico Que Es
  5. Curso De Hacking Etico
  6. Certificacion Hacking Etico
  7. Nfc Hacking
  8. Start Hacking

Top Process Related Commands In Linux Distributions


Commands in Linux are just the keys to explore and close the Linux. As you can do things manually by simple clicking over the programs just like windows to open an applications. But if you don't have any idea about commands of Linux and definitely you also don't know about the Linux terminal. You cannot explore Linux deeply. Because terminal is the brain of the Linux and you can do everything by using Linux terminal in any Linux distribution. So, if you wanna work over the Linux distro then you should know about the commands as well. In this blog you will exactly get the content about Linux processes commands which are are given below.

ps

The "ps" command is used in Linux to display your currently active processes over the Linux based system. It will give you all the detail of the processes which are active on the system.

ps aux|grep

The "ps aux|grep" command is used in Linux distributions to find all the process id of particular process like if you wanna know about all the process ids related to telnet process then you just have to type a simple command like "ps aux|grep 'telnet'". This command will give you the details about telnet processes.

pmap

The "pmap" command in Linux operating system will display the map of processes running over the memory in Linux based system.

top

The "top" command is used in Linux operating system to display all the running processes over the system's background. It will display all the processes with process id (pid) by which you can easily kill/end the process.

Kill pid

Basically the kill command is used to kill or end the process or processes by simply giving the process id to the kill command and it will end the process or processes. Just type kill and gave the particular process id or different process ids by putting the space in between all of them. kill 456 567 5673 etc.

killall proc

The "killall proc" is the command used in Linux operating system to kill all the processes named proc in the system. Killall command just require a parameter as name which is common in some of the processes in the system.

bg

The "bg" is the command used in Linux distributions to resume suspended jobs without bringing them to foreground.

fg

The "fg" command is used in Linux operating system to brings the most recent job to foreground. The fg command also requires parameters to do some actions like "fg n" n is as a parameter to fg command that brings job n to the foreground.More info

jueves, 23 de abril de 2020

AutoNSE - Massive NSE (Nmap Scripting Engine) AutoSploit And AutoScanner


Massive NSE (Nmap Scripting Engine) AutoSploit and AutoScanner. The Nmap Scripting Engine (NSE) is one of Nmap's most powerful and flexible features. It allows users to write (and share) simple scripts (using the Lua programming language ) to automate a wide variety of networking tasks. Those scripts are executed in parallel with the speed and efficiency you expect from Nmap. Users can rely on the growing and diverse set of scripts distributed with Nmap, or write their own to meet custom needs. For more informations https://nmap.org/book/man-nse.html

Installation
$ git clone https://github.com/m4ll0k/AutoNSE.git
$ cd AutoNSE
$ bash autonse.sh

Exmaples
$ bash autonse.sh


Related articles


Raccoon - A High Performance Offensive Security Tool For Reconnaissance And Vulnerability Scanning


Offensive Security Tool for Reconnaissance and Information Gathering.

Features
  • DNS details
  • DNS visual mapping using DNS dumpster
  • WHOIS information
  • TLS Data - supported ciphers, TLS versions, certificate details, and SANs
  • Port Scan
  • Services and scripts scan
  • URL fuzzing and dir/file detection
  • Subdomain enumeration - uses Google Dorking, DNS dumpster queries, SAN discovery, and brute-force
  • Web application data retrieval:
    • CMS detection
    • Web server info and X-Powered-By
    • robots.txt and sitemap extraction
    • Cookie inspection
    • Extracts all fuzzable URLs
    • Discovers HTML forms
    • Retrieves all Email addresses
  • Detects known WAFs
  • Supports anonymous routing through Tor/Proxies
  • Uses asyncio for improved performance
  • Saves output to files - separates targets by folders and modules by files

Roadmap and TODOs
  • Support multiple hosts (read from the file)
  • Rate limit evasion
  • OWASP vulnerabilities scan (RFI, RCE, XSS, SQLi etc.)
  • SearchSploit lookup on results
  • IP ranges support
  • CIDR notation support
  • More output formats

About
A raccoon is a tool made for reconnaissance and information gathering with an emphasis on simplicity.
It will do everything from fetching DNS records, retrieving WHOIS information, obtaining TLS data, detecting WAF presence and up to threaded dir busting and subdomain enumeration. Every scan outputs to a corresponding file.
As most of Raccoon's scans are independent and do not rely on each other's results, it utilizes Python's asyncio to run most scans asynchronously.
Raccoon supports Tor/proxy for anonymous routing. It uses default wordlists (for URL fuzzing and subdomain discovery) from the amazing SecLists repository but different lists can be passed as arguments.
For more options - see "Usage".

Installation
For the latest stable version:
pip install raccoon-scanner
Or clone the GitHub repository for the latest features and changes:
git clone https://github.com/evyatarmeged/Raccoon.git
cd Raccoon
python raccoon_src/main.py

Prerequisites
Raccoon uses Nmap to scan ports as well as utilizes some other Nmap scripts and features. It is mandatory that you have it installed before running Raccoon.
OpenSSL is also used for TLS/SSL scans and should be installed as well.

Usage
Usage: raccoon [OPTIONS]

Options:
--version Show the version and exit.
-t, --target TEXT Target to scan [required]
-d, --dns-records TEXT Comma separated DNS records to query.
Defaults to: A,MX,NS,CNAME,SOA,TXT
--tor-routing Route HTTP traffic through Tor (uses port
9050). Slows total runtime significantly
--proxy-list TEXT Path to proxy list file that would be used
for routing HTTP traffic. A proxy from the
list will be chosen at random for each
request. Slows total runtime
--proxy TEXT Proxy address to route HTTP traffic through.
Slows total runtime
-w, --wordlist TEXT Path to wordlist that would be used for URL
fuzzing
-T, --threads INTEGER Number of threads to use for URL
Fuzzing/Subdomain enumeration. Default: 25
--ignored-response-codes TEXT Comma separated list of HTTP status code to
ignore for fuzzing. Defaults to:
302,400,401,402,403,404,503,504
--subdomain-list TEXT Path to subdomain list file that would be
used for enumeration
-S, --scripts Run Nmap scan with -sC flag
-s, --services Run Nmap scan with -sV flag
-f, --full-scan Run Nmap scan with both -sV and -sC
-p, --port TEXT Use this port range for Nmap scan instead of
the default
--tls-port INTEGER Use this port for TLS queries. Default: 443
--skip-health-check Do not test for target host availability
-fr, --follow-redirects Follow redirects when fuzzing. Default: True
--no-url-fuzzing Do not fuzz URLs
--no-sub-enum Do not bruteforce subdomains
-q, --quiet Do not output to stdout
-o, --outdir TEXT Directory destination for scan output
--help Show this message and exit.

Screenshots

HTB challenge example scan:


Results folder tree after a scan:


Related word